Wishlist 0 ¥0.00

5 Tools To Create Windows To Go USB Of Windows 10

Windows To Go is a handy feature that lets you install and run Windows operating system from a USB drive. The official Windows To Go creator is available only in the Enterprise and Education editions of Windows 10, but that doesn’t mean you can’t create Windows To Go drive in other editions of Windows 10.

Windows enthusiasts and developers have come up with workarounds to create Windows To Go drive from any edition Windows 10. In other words, with the help of these third-party tools, one can install and boot Windows 10 from USB drives.

4 tools to create windows to go USB in Windows 10

Although it’s entirely possible to prepare a Windows To Go drive of Windows 10 right from the native Command Prompt, the method is not for everyone, and we are not discussing it here. In this guide, we will share the top four free utilities out there to create Windows To Go drive on all editions of Windows 10.


Before you use any of the below-mentioned software or any other software for that matter, be sure to use a Windows To Go certified USB drive. Standard flash drives are not good enough for Windows To Go drive and are usually tad slow. As you likely know, Microsoft recommends you use 32 GB+ USB drives, but some of these third-party tools allow you to create Windows To Go even on a 16 GB drive.

Method 1 of 5

Rufus to create Windows To Go drive of Windows 10

Rufus 2.0 and above versions support creating Windows To Drive. The software allows creating Windows To Go drive from any edition of Windows 10. The only condition is that you must be running Rufus 2.0 or above versions on Windows 8.1 or Windows 10 to activate the Windows To Go feature, which means you can’t run this software on Windows 7 to create Windows To Go drive of Windows 10.

Preparing Windows To Go drive of Windows 10 with Rufus is straightforward. The procedure is very similar to creating a bootable USB, but the only change is that you need to select Windows To Go option instead of the default Bootable USB.

4 Free tools to create Windows to go

We recommend you go through our how to use Rufus to create Windows To Go drive guide for step-by-step instructions.

The download size of Rufus is under 1 MB, and it’s a portable software that requires no installation.

Method 2 of 5

Use WinToUSB to create Windows 10 To Go drive

Before the release of WinToUSB software, Windows users didn’t have third-party software to create Windows To Go drive. In other words, WinToUSB is the first software released to prepare Windows To Go USB drive of any version of the Windows operating system. The software supports all editions of Windows 7, Windows 8/8.1, and Windows 10.

4 Free Tools To Create Windows To Go Drive picture2

Although it’s relatively simple to use, you can go through our how to use WinToUSB to create Windows To Go drive for detailed instructions. Unlike other tools, WinToUSB is capable of cloning your current Windows installation as a Windows To Go USB drive. That is, you can have the version and edition of Windows installed on your PC on your USB drive as well.

Method 3 of 5

AOMEI Partition Assistant to create Windows To Go drive

AOMEI Partition Assistant Standard (free) is one of the many free utilities out there to manage disk partitions on Windows 10. In addition to disk management tools, the software offers a tool called Windows To Go Creator to create Windows To Go drive easily.

4 Free Tools To Create Windows To Go Drive picture3

As with the case of WinToUSB and Rufus, Partition Assistant is compatible with all editions of Windows 8/8.1 and Windows 10.

Method 4 of 5

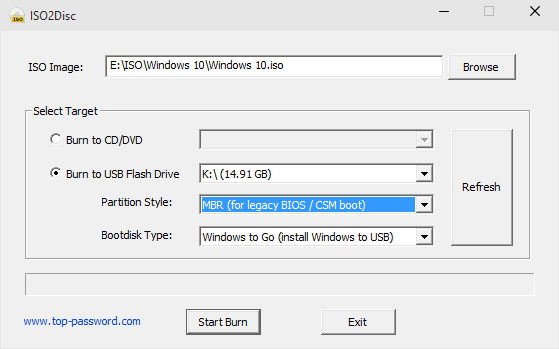
Use ISO2Disc to Create Windows To Go USB drive

ISO2Disc, as the name suggests, a simple program designed to burn ISO files to CDs, DVDs and USB drives. In addition to prepare bootable Windows 10 DVDs, it can also create Windows To Go USB drives. Refer to our using ISO2Disc to prepare bootable USB and Windows To Go drives article for more information about this program.

ISO2Disc Windows to Go

Method 5 of 5

WiNToBootic to prepare Windows 10 To Go

WiNToBootic is another free software available to create Windows To Go drive from the non-enterprise edition of Windows 10. The software, just like Rufus, WiNToBootic was initially released to prepare bootable Windows USB drives, but the newest version of the software allows creating Windows To Go drive as well.

Update: We have removed the download link as WiNToBootic is not “clean,” according to VirusTotal. Although it could be a false positive, we don’t encourage downloading it. That’s all for now!

If you’re aware of any better software to create Windows To Go drive, please let us know in the comments.

How to Install Windows XP

Windows XP is one of Microsoft’s most popular operating systems, and though it’s starting to show its age, many people still use it exclusively. Whether you’ve got an old computer that you want to get functioning again or you want to install XP on your new machine, it will only take a short while.

  • Note: Microsoft is no longer supporting Windows XP, which means it will no longer receive essential security fixes. It is highly recommended that you consider upgrading to a newer version of Windows, such as Windows 7, Windows 8, or Windows 10.
 
 
Part 1

Setup

  1. Image titled Install Windows XP Step 1
    1
    Ensure that your computer can run Windows XP. Your computer will need to meet or exceed the minimum system requirements in order to run Windows XP. You can find your system information by either checking the computer manufacturer's manual, or by running DirectX Diagnostic on an existing Windows operating system of the computer.
    • To start the DirectX Diagnostic, open the Run dialog (press WinKey+R simultaneously), type dxdiag, and click OK.
    • Minimum System Requirements
      • 300 MHz Intel or AMD CPU
      • 128 megabytes (MB) of system RAM
      • 1.5 gigabytes (GB) of available drive space
      • Super VGA (800x600) or higher display adapter
      • CD or DVD-ROM
      • Keyboard and mouse, or other pointing devices
      • Network Interface Adapter required for Internet and Network Connectivity
      • Sound card and speakers or headphones
     
  2. Image titled Install Windows XP Step 2
    2
    Find your Windows XP Product Key. It is printed on a sticker on your software package or located on the computer itself. It is a string of 5 groups of characters (each 5 long), separated by dashes, resulting in 25 characters in all. You need the product key to complete installing Windows.
     
     
  3. Image titled Install Windows XP Step 3
    3
    Set your computer to boot from CD/DVD. Before inserting the CD, you'll need to set your computer to boot from a CD instead of from the hard drive. This will allow you to load the Windows XP setup files before your computer boots to its installed operating system. You can change the boot order from the BOOT menu in your BIOS.
    • To enter the BIOS of your computer, you usually press F9 or DEL when your computer starts or notifies you that you can enter "setup". Click the green "BIOS" link for more information. [1]
    • In the BOOT menu, set the order so that your CD/DVD-ROM drive is set as the 1st Boot Device.
    • If you are installing Windows XP from a USB drive, make sure that the USB drive is set as the 1st Boot Device. You may need to have the USB drive inserted for it to appear as an option.


Part 2

Installation

  1. Image titled Install Windows XP Step 4
    1
    Load the installer. Once your Boot Order is set, insert the Windows XP CD into your drive and Save and Exit from the BIOS. Your computer will reboot and you will be presented with the message: Press any key to boot from CD. Press any key on your keyboard to start the Setup program.
    • Setup will load files necessary to begin the installation, which may take a few moments. Once the loading is complete, you will be taken to the Welcome screen.
     
     
  2. Image titled Install Windows XP Step 5
    2
    Press ENTER to begin installation. Once the loading is complete, you will be taken to the Welcome screen. You are given several options, but if you are installing or reinstalling Windows XP, you’ll want to press ENTER to start the installation configuration.
     
     
  3. Image titled Install Windows XP Step 6
    3
    Read the License Agreement. This document tells you what you can and can’t do with Windows, and your rights as the consumer. After reading, press F8 indicating you agree to the terms.
     
  4. Image titled Install Windows XP Step 7
    4
    Select the partition you want to install on. You will see a list of available partitions on your installed hard drives. If you are installing Windows XP on a new hard drive, you should see only one entry labeled "Unpartitioned space." If you have a previous version of Windows or Linux installed on your computer, you will potentially have multiple partitions.
    • Installing Windows XP will erase all of the data on the partition that you choose. Select a partition that is empty or that contains data that you do not care to lose.
    • You can delete your partitions with the “D” key. This will return them to “Unpartitioned space”. Any data on the partition will be lost when it is deleted.
     
  5. Image titled Install Windows XP Step 8
    5
    Create a new partition. Select the Unpartitioned space and press “C”. This will open a new screen where you can set the partition’s size from the available space. Enter the size in megabytes (MB) for the new partition and then press ENTER.
    • By default, the partition will be set to the maximum amount of available space. Unless you plan on creating multiple partitions, you can usually leave this at its default.
    • Windows XP requires at least 1.5 gigabytes (1536 MB) for its installation files, but you will want more than this for programs, documents, downloads, and other files. 5 gigabytes (5120 MB) is a good baseline amount for Windows XP, with more if you plan on installing a lot of programs.
    • You can create multiple partitions on a single drive. This can allow you to separate your programs from your movies and music, or to install another operating system. Windows XP can only be installed on one discrete partition.
     
  6. Image titled Install Windows XP Step 9
    6
    Select your new partition. Once you’ve created your installation partition, you will be returned to the partition selection screen. Select your new partition, usually labeled "C: Partition 1 [Raw]" and press ENTER.
     
  7. Image titled Install Windows XP Step 10
    7
    Select "Format the Partition using the NTFS File System" and press ENTER. NTFS is the preferred method, supporting a larger amount of disk space per partition than FAT, and including security features at the file system level. NTFS also includes system level compression. There are almost no situations anymore where choosing FAT would be preferable.
    • If your partition size is larger than 32 GB, you will not be given the option to choose FAT.
    • It is highly recommended to avoid Quick Format, as this skips an important process that checks the hard drive for errors or bad sectors. This scan is what consumes the majority of the time taken when performing a full format. If there are errors on a disk at the physical level, it's best to catch them now rather than later.
     
  8. Image titled Install Windows XP Step 11
    8
    Wait for the format to complete. The system will now format the partition. The length of time this process requires depends on the speed and size of the drive. In general, the larger the partition, the longer the process will take.
     
  9. Image titled Install Windows XP Step 12
    9
    Wait for the Setup files to copy. Windows will now start copying files from the installation disc and prompt you to reboot the computer when the process is completed. Press ENTER when prompted to reboot, otherwise it will do so automatically after 15 seconds.
     
  10. Image titled Install Windows XP Step 13
    10
    Allow the computer to boot normally. You will see the message asking you to press a key to boot from CD. Ignore it and allow the computer to continue booting from the hard drive. You will see the Windows logo as the Setup program loads.
     
  11. Image titled Install Windows XP Step 14
    11
    Wait for the installation to proceed. After the Windows logo goes away, you will see a list of steps remaining on the left side of the screen, and tips for using windows on the right. The time remaining for the installation will be displayed below the list of steps remaining.
    • It is normal for the screen to flicker, turn on and off, or resize during this process.
     
  12. Image titled Install Windows XP Step 15
    12
    Choose your language and region settings. During the installation process a dialog window will appear, asking you to choose your Regional settings. Select appropriate settings native to your area. Click the Next button when that is completed.
    • Enter your full name if you want. This will be set as the “owner” of Windows, and will be attached to certain things, such as Document creation.
     
  13. Image titled Install Windows XP Step 16
    13
    Enter your Product Key. You will not be able to complete the installation process without a valid Product Key. Click "Next" to continue.
    • Some versions of Windows will not ask for the Product Key until installation is complete.
     
  14. Image titled Install Windows XP Step 17
    14
    Set your computer’s name. This will be the name that represents the computer on a network. Windows sets a default name, but you can change it if you would like. You can also set a password for the Administrator account. This is optional, but recommended for public computers.
     
  15. Image titled Install Windows XP Step 18
    15
    Select your time zone. Ensure that the date/time are correct. Click "Next" to continue.
     
  16. Image titled Install Windows XP Step 19
    16
    Choose your network settings. Almost all users installing Windows XP on a home or personal computer can leave "Typical Settings" selected for Network Setup. If you are installing Windows XP in a corporate or academic environment, check with the system administrator, though Typical Settings will most likely work.
    • In the next window, nearly all users can select “No, this computer is not on a network, or is on a network without a domain.” If you are in a corporate setting, ask your system administrator which you should choose.
    • You can typically leave the workgroup name set to default.
     
  17. Image titled Install Windows XP Step 20
    17
    Wait for the installation to finalize. This will only take a few minutes, and the computer will reboot when it is finished installing. Once the computer reboots, you will be taken to the Windows XP desktop. At this point, installation is complete, though there are a few things left to do before Windows is completely usable..
     
 
Part 3

Completion

  1. Image titled Install Windows XP Step 21
    1
    Set your display preferences. Once Windows loads, you will be told that Windows will automatically configure your display. Click OK to start the configuration. Your screen will flash a couple times, and then you will be asked if you can read the box that appears.
     
  2. Image titled Install Windows XP Step 22
    2
    Set your connection preferences. If your computer is connected to the internet, select your connection type. Press Next to continue.
     
  3. Image titled Install Windows XP Step 23
    3
    Activate your copy of Windows. If connected to the Internet, Select "Activate Now." Windows will connect to the activation server and automatically authenticate your copy of Windows. If you haven’t entered your Product Key yet, you will need to enter it now.[2]
     
  4. Image titled Install Windows XP Step 24
    4
    Create Users. After the Activation Process, a window will appear allowing you to select the users for the computer. Enter your name, and the names of others who will be using the machine. Press Next to continue.
     
  5. Image titled Install Windows XP Step 25
    5
    Start using Windows. You will now be looking at the default Windows XP Desktop. Congratulations! There are a few things that you should probably do now that you have Windows up and running:

How to Install XP on an External Hard Drive

Windows XP was built to run on internal system hard drives. It has no simple setup or configuration option to run on an external hard drive. It is possible to \"make\" XP run on an external hard drive, but it involves a lot of tweaking, including making the external drive bootable and editing boot files.


Creating the Windows XP Boot Image

Set your BIOS so that USB booting is enabled. (Your BIOS must support boot from USB.) Connect the USB external hard drive directly to your computer.

Make an ISO image (an .iso file is an archive disk image of an optical disk) from the Windows XP CD-ROM using your preferred software. Save to your hard drive.


Open the ISO file you just created. Navigate to the I386 folder, and select the following files: TXTSETUP.SIF, DOSNET.INF, USB.IN_, USBPORT.IN_, and USBSTOR.IN_. Extract the files and put them into a folder to work with.

Open a command prompt and use Cab SDK to extract the contents of the .IN_ files; Cab SDK is a Microsoft compression and decompression program available as an .exe file in your Windows directory. Each of the .IN_ files contains exactly one .inf file. An example command line would be: \"cabarc x USBSTOR.IN_\" . You should end up with three new files in the folder, called USB.inf, usbport.inf and usbstor.inf. Delete the .IN_ files.

Open the files using a simple text editor such as Notepad. Edit them according to the section below titled \"Editing Files.\"

Open the previously created ISO file and delete the files you extracted earlier. Replace them with the newly modified files.

Save the ISO files and burn them to a CD using the burning software of your choice.

Insert the CD you created and restart the computer. Make sure it is set to boot from CD. Most computers will do this automatically, but if not, hit F8 on startup to choose boot options. When asked, choose the external USB hard drive to install WIndows XP.

Editing Files

Open TXTSETUP.SIF and move the following entries from [InputDevicesSupport.Load] to the [BootBusExtenders.Load]: usbehci = usbehci.sys usbohci = usbohci.sys usbuhci = usbuhci.sys usbhub = usbhub.sys usbstor = usbstor.sys

Move the following entries from [InputDevicesSupport] to [BootBusExtenders]: usbehci = \"Erweiterter Hostcontroller\",files.usbehci,usbehci usbohci = \"Open Hostcontroller\",files.usbohci,usbohci usbuhci = \"Universeller Hostcontroller\",files.usbuhci,usbuhci usbhub = \"Standard-USB-Hubtreiber\",files.usbhub,usbhub usbstor = \"USB-Speicherklassentreiber\",files.usbstor,usbstor


Insert the following in the [HiveInfs.Fresh] section: AddReg = hivedef.inf,AddReg AddReg = hivesys.inf,AddReg AddReg = hivesft.inf,AddReg AddReg = hivecls.inf,AddReg AddReg = hiveusd.inf,AddReg AddReg = dmreg.inf,DM.AddReg AddReg = usbboot.inf,usbservices

Insert the following commands into the [SourceDisksFiles] section:

Open DOSNET.INF and change the second [Files] section to look like this: [Files] d1,usbboot.inf d1,_default.pif d1,12520437.cpx d1,12520850.cpx

Open USB.INF and change lines in the [StandardHub.AddService] and [CommonClassParent.AddService] sections to look like this:

Open usbport.inf and change lines in the [EHCI.AddService], [OHCI.AddService] , [UHCI.AddService] and [ROOTHUB.AddService] sections to look like this:

Open usbstore.inf and change lines in the [USBSTOR.AddService] section to look like this:

Create a new file called USBBOOT.INF in the same directory as the other modified files, and paste the following content into it: [usbservices]

Delete your original extracted .IN_ files. Open the command prompt and navigate to the folder with your changed files. Execute these commands to repack the files: cabarc n USB.IN_ USB.inf cabarc n USBPORT.IN_ usbport.inf cabarc n USBSTOR.IN_ usbstor.inf

Items you will need

  • Windows XP CD

  • USB external hard disk drive

  • ISO creation software (WinISO)

  • CD-burning software that can handle ISO files

virtualbox虚拟机和主机不在同一网段,虚拟机访问互联网网络配置

用virtual box在win10里搭建了一个虚拟机,虚拟机安装的是linux,部署了nginx、mysql、redis、MongoDB等开发服务器,刚开始的时候,我的win10主机和虚拟机都在同一个网段,比如 主机是192.168.1.100,虚拟机是192.168.1.101,这样,我只要设置virtual box主机的网络为“桥接网络”方式,并且在Linux主机里配置网卡的网关为无线路由器的IP地址,比如:192.168.1.1,这样win10主机和linux虚拟主机就可以通讯,并且linux虚拟机也可以访问互联网,配置很简单,使用也没有问题。

可是我的电脑是笔记本,经常会在公司、家里、获取其他办公环境使用。

这时笔记本电脑主机连接的网络环境会发生变化,比如公司的IP段是:192.168.2.*,这样,如果每次切换网络环境就要将虚拟机切换到对应的网段,设置起来比较麻烦。

刚开始,我尝试了一种方式,就是将win10主机的网卡设置为手动设置IP,并且在网卡的高级设置里增加多一个和虚拟主机同一网段的IP,将虚拟机的网关设置为网卡新增的IP,这样改动后,win10主机和linux虚拟机是可以通讯的,但是,linux虚拟机却不能访问互联网,这样在开发微信相关的程序时就会有问题,因为,虚拟主机和微信服务器必须要通讯才可以进行开发调试。

最后,只能更改为下面的方案,亲测可用,使用也方便,操作步骤如下:

1 给win10主机增加一个虚拟网卡:

1)打开win10的设备管理器,定位到网络适配器,然后从操作菜单里点击“添加过时硬件”

2)选择“安装我手动从列表选择的硬件”

3)选择安装的硬件是“网络适配器”,并且在下一步里,选择安装的是Microsoft公司的“Microsoft KM-TEST环回适配器”

4)继续下一步完成安装后,进入网络连接配置功能里,就会多了一个虚拟网卡了

5)对该虚拟网卡的属性进行设置,记得不用设置网关,也不用设置DNS,如下图:

6)在真正的网卡上设置网络共享,记得共享上网的网卡需要选择刚刚新增的虚拟网卡,如下图:

7)进入virtual box主机里设置虚拟主机的网络为“桥接网络”,并且指定的网卡是刚刚新增的虚拟网卡,如下图:

8)启动虚拟主机,给虚拟主机的网卡配置一个跟虚拟网卡处于同一网段的IP,并且将网关指定为虚拟网卡设置的IP地址:

9)systemctl restart netwrok 重启网络,然后win10主机和linux虚拟主机就可以通讯了,同时linux虚拟主机也可以访问互联网了

我还尝试过用virtual box自带的VirtualBox Host-Only Ethernet Adapter进行连接,如果通过VirtualBox Host-Only Ethernet Adapter我测试过时不能桥接的,只能在virtual box主机网络配置中选择为“host-only”方式,其他的配置方式基本相同,不过个人觉得用上面的方式更简单直接一点。


About Us

Since 1996, our company has been focusing on domain name registration, web hosting, server hosting, website construction, e-commerce and other Internet services, and constantly practicing the concept of "providing enterprise-level solutions and providing personalized service support". As a Dell Authorized Solution Provider, we also provide hardware product solutions associated with the company's services.
 

Contact Us

Address: No. 2, Jingwu Road, Zhengzhou City, Henan Province

Phone: 0086-371-63520088 

QQ:76257322

Website: 800188.com

E-mail: This email address is being protected from spambots. You need JavaScript enabled to view it.