Wishlist 0 ¥0.00

如何使用 icacls 命令设置或重置文件或文件夹的 NTFS 权限

icalcs

In this article, we will learn how to set or reset NTFS permissions of a file or folder in a Windows operating system, with icacls command.

在本文中,我们将学习如何使用 icacl 命令设置或重置 Windows 操作系统中文件或文件夹的 NTFS 权限。

It can happen that, in some cases, we may lose sight of files or directories permissions, and when we try to access a specific file we have no result because we don’t have the rights to do so.
Or we may have to run a software that, for permission issue, does not work as it should.

在某些情况下,我们可能会忽略文件或目录的权限,当我们尝试访问一个特定的文件时,我们没有结果,因为我们没有这样做的权限。或者我们可能不得不运行一个软件,为了获得许可,它不能正常工作。

We may also need to access a file that came from an old backup or another computer and was therefore created with a different user; even then, it will not be possible to access it.

我们还可能需要访问一个来自旧备份或其他计算机的文件,因此是用不同的用户创建的; 即使这样,也不可能访问它。

In all these cases, Icacls command comes to help.

在所有这些情况下,Icacls 命令都会提供帮助。

What is Icacls?

什么是 Icacls?

Icacls is the replacement for cacls (Change Access Control Lists), a command-line utility that allows you to show and perform some operations on ACL for files or directories.

Icacls 是 cacls (更改访问控制列表)的替代品,这是一个命令行实用程序,允许您在 ACL 上显示和执行文件或目录的一些操作。

ACL (Access Control List) is a list of permissions for a filesystem object and defines how its security is controlled by managing who and how it can be accessed.

ACL (访问控制列表)是文件系统对象的权限列表,通过管理访问者和访问方式,定义了如何控制其安全性。

Actually, operations on ACL are not the only ones possible with this tool.
What makes it a powerful tool is also the ability to perform backup and restore operations on ACL for files or directories, or to search for files that have a specific user as owner.
And in addition, in the event that an ACL is damaged or destroyed, with icacls you can restore it by resetting it and setting default permissions or inheriting those of the parent.

实际上,ACL 上的操作并不是这个工具唯一可能的操作。它之所以是一个强大的工具,还因为它能够对 ACL 执行文件或目录的备份和恢复操作,或者搜索具有特定用户作为所有者的文件。另外,如果 ACL 损坏或销毁,您可以通过重置 icacl 并设置默认权限或继承父权限来恢复它。

Icacls: the reset and grant functions

Icacls: 重置和授予函数

Reset

重置

Icacls is a native Windows command that runs on Windows Vista, Windows 7, Windows 8 and Windows 10.
Imagine that we have an external hard disk on which a study made in 2018 was stored, and we want to recover it, but we do not have complete control.

Icacls 是一个本地 Windows 命令,可以在 Windows Vista,Windows 7,Windows 8和 Windows 10上运行。想象一下,我们有一个外部硬盘,上面存有2018年的一项研究,我们想要恢复它,但是我们没有完全的控制权。

As soon as we try to open the folder, we will have the following alert message.

一旦我们尝试打开文件夹,我们将得到以下警告消息。

openfolder deny

One solution is, therefore, to use the reset function of Icacls.
But pay attention to the following steps.

因此,一个解决方案是使用 Icacls 的重置功能。

Let’s open the command terminal in administrator mode.

让我们以管理员模式打开命令终端。

command prompt

Let’s move to the folder and type the reset command as follows:

让我们移动到文件夹并键入 reset 命令如下:

 $> icacls * /t /q /c /reset

And again, we’ll have “Access is denied” as a response.

同样,我们会用“拒绝访问”作为回应。

reset and noaccess

We must therefore first become the owner of the folder with the takeown command:

因此,我们必须首先使用 takeown 命令成为文件夹的所有者:

$> takeown / R / F *

takeown permission

By clicking Yes, you will now have a reset of ACL, and the permission state will be as follows:

通过单击 Yes,您现在将有一个 ACL 重置,并且权限状态如下:

advanced security settings

Grant

格兰特

Now, imagine being in the following situation:

现在,想象一下这样的情况:

other advanced security settings

Only the user named Peter has access to the folder, and we want to give grants also to the federica user.

只有名为 Peter 的用户可以访问该文件夹,我们还希望向 federica 用户提供补助。

With the previous command, we can become the owner of the folder

使用前面的命令,我们可以成为文件夹的所有者

$> takeown / R / F *

and then type the following command:

然后输入以下命令:

$> icacls "E:\Study2018" /t /grant:F

In this case, I have inserted the options /t, that means recursive, and F that means “full access” for the user on which we want to give grants.

在这个例子中,我插入了选项/t,这意味着递归,而 f 意味着我们想要授予的用户的“完全访问权”。

grant full access

For more options, see the official page.

有关更多选项,请参阅官方页面。

Other icacls functions

其他 icacls 功能

If you need to save ACLs in a file for a later restore, you can do by using a couple of “save and restore” commands.
A very simple operation from a point of view: information about the ACLs are saved in a file that can be used in case of need to restore a previous situation.
However, it should be noted that data on access rights, especially in shared folders, can be very variable over time.
We could then find ourselves in a situation where we are going to restore a situation that is different from reality or even inconsistent.
Moreover, the file that is created, openable and readable with a common text editor, seems to be a Unicode text.
But beware, because it isn’t.

如果您需要在文件中保存 acl 以便以后进行恢复,可以使用两个“保存和恢复”命令。从某种角度来看,这是一个非常简单的操作: 有关 acl 的信息保存在一个文件中,在需要恢复以前的情况时可以使用这个文件。然而,应该注意的是,访问权限数据,尤其是共享文件夹中的访问权限数据,随着时间的推移可能变化很大。然后,我们可能会发现自己处于这样一种情况,即我们要恢复一种与现实不同甚至不一致的局面。此外,使用通用文本编辑器创建、可开启和可读的文件似乎是 Unicode 文本。但是要小心,因为它不是。

Open the file and save it with some changes will make it unusable in Restore operations.

打开文件并通过一些更改将其保存,这将使其在“还原”操作中无法使用。

The couple of “save and restore” commands is as follows:

“保存和恢复”命令如下:

icacls FILE_O_DIRECTORY /save aclfile /t

icacls DIRECTORY /restore aclfile

Icacls DIRECTORY/restore aclfile

You will immediately notice a difference between the two commands.

您将立即注意到这两个命令之间的差异。

The save command can be executed both on file and on directories (FILE_O_O_DIRECTORY must be replaced with the name of the file or directory for which we want to save the ACL).

可以在文件和目录上执行 save 命令(FILE _ o _ o _ directory 必须替换为我们要为其保存 ACL 的文件或目录的名称)。

While the restore command only works on directories.

而 restore 命令只对目录有效。

An example of use is as follows:

使用的一个例子如下:

E:\> icacls filediprova.txt /save aclfile /t
E:\>icacls . /restore aclfile

As you can see, in restore command case we will not use filediprova.txt but the directory in which it is contained.

正如您所看到的,在 restore 命令情况下,我们将不使用 filediprova.txt,而是使用包含它的目录。

Conclusions

结论

In Windows systems, the ability managing access control lists is a strength that allows users and processes to make the best use of resources.
In some cases, it can be complicated, but with icacls tool, we can have many functions that help to ensure security.

在 Windows 系统中,管理访问控制列表的能力是允许用户和进程最佳利用资源的一个优点。在某些情况下,它可能比较复杂,但是使用 icacl 工具,我们可以使用许多功能来帮助确保安全性。

windows下批量修改文件(或文件夹)权限或所有者

简介:

强制将当前目录下的所有文件及文件夹、子文件夹下的所有者更改为管理员组(administrators)命令:

takeown /f * /a /r /d y


将所有d:\documents目录下的文件、子文件夹的NTFS权限修改为仅管理员组(administrators)完全控制(删除原有所有NTFS权限设置):

cacls d:\documents\*.* /T /G administrators:F


在原有d:\documents目录下的文件、子文件夹的NTFS权限上添加管理员组(administrators)完全控制权限(并不删除原有所有NTFS权限设置):

cacls d:\documents\*.* /T /E /G administrators:F


取消管理员组(administrators)完全控制权限(并不删除原有所有NTFS权限设置):

cacls \Server\Documents\%username%\我的文档 /t /e /r "mddq\domain admins"

cacls \Server\Documents\%username%\桌面 /t /e /r "mddq\domain admins"

如何通过组策略为文件和文件夹分配权限

How to Assign Permissions to Files and Folders through Group Policy

如何通过组策略为文件和文件夹分配权限

件夹分配权限


Assigning permissions for each file and folder individually can be complex and time consuming. To avoid going through the annoyances of changing permissions for a bunch of folders individually, we can use Group Policy to do it. In this article, you will see the process of assigning file and folder permissions across a domain through GPO. These instructions can be extremely helpful, and save your time if you have to assign permissions to a large number of systems with a common setup. Later in the article, you will also see the way to audit permission changes and to audit other changes in File Server through Lepide File Server Auditor (part of Lepide Data Security Platform).

为每个文件和文件夹单独分配权限可能是复杂和耗时的。为了避免为一堆文件夹单独更改权限的烦恼,我们可以使用组策略来完成。在本文中,您将看到通过 GPO 在整个域中分配文件和文件夹权限的过程。这些说明非常有用,如果您必须使用通用设置为大量系统分配权限,则可以节省时间。在本文的后面,您还将看到如何通过 Lepide File Server Auditor (Lepide Data Security Platform 的一部分)审计权限更改和审计 File Server 中的其他更改。

Steps to Assign File/Folder Permissions

分配文件/文件夹权限的步骤

  1. Go to “Start Menu” -> “Administrative Tools”, and click “Group Policy Management” to access its console.
  2. 转到“开始菜单”-> “管理工具”,然后单击“组策略管理”来访问控制台。
  3. In left panel of “Group Policy Management Console”, you have to create a new Group Policy Object or edit an existing Group Policy Object.
  4. 在“组策略管理控制台”的左侧面板中,必须创建新的组策略对象或编辑现有的组策略对象。
  5. To create a new GPO, right click “Group Policy Objects”, and select “New” from the context menu. It shows “New GPO” window. 要创建一个新的 GPO,右键单击“组策略对象”,然后从上下文菜单中选择“ New”。它显示“新 GPO”窗口
    Figure 1: Creating a new GPO
    图1: 创建一个新的 GPO
  6. Enter a name for the Group Policy Object (GPO) (in this case it is Assigning Folder Permissions), leave “Source Starter GPO” as “(none)”.
  7. 输入组策略对象(GPO)的名称(在本例中为 assignment Folder Permissions) ,保留“ Source Starter GPO”为“(none)”。
  8. Right-click on the newly created “User Folder Permissions” GPO, and select “Edit GPO”. Group Policy Management Editor window appears on the screen
  9. 右键单击新创建的“用户文件夹权限”GPO,并选择“编辑 GPO”。“组策略管理编辑器”窗口将显示在屏幕上
  10. Navigate to “Computer Configuration” -> “Policies” -> “Windows Settings” -> “Security Settings” -> “File System” 点击”计算机配置”->”策略”->”Windows 设置”->”安全设置”->”文件系统”
    Figure 2: Navigate to File System
    图2: 导航到文件系统
  11. Right-click on “File System” in the left pane and select “Add File…” It shows the following dialog box. 右键单击左窗格中的“文件系统”,然后选择“添加文件...”,它将显示以下对话框
    Figure 3: Select file or folder which you want to assign permissions on
    图3: 选择要分配权限的文件或文件夹
  12. Browse the folder or file that you wish to assign permissions on, and left click to select it. Click “OK”.
  13. 浏览您希望分配权限的文件夹或文件,然后左击选择它。单击“确定”。
  14. “Database Security” window appears on the screen “数据库安全”窗口出现在屏幕上
    Figure 4: Database security window 图4: 数据库安全窗口
  15. Click “Advanced” button to access “Advanced Security Settings” window. Stay on the “Permissions” tab that appears by default. 单击“高级”按钮进入“高级安全设置”窗口。停留在默认出现的“权限”选项卡上
    Figure 5: Advanced security settings window
    图5: 高级安全设置窗口
  16. On this tab, either select an existing user and click “Edit…” or click “Add…” to add a new user to the permissions.
  17. 在此选项卡上,选择一个现有用户并单击“编辑...”或单击“添加...”以向权限添加一个新用户。
  18. “Permissions Entry for…” dialog box opens up. Here, you will see that there is a list of permissions available for your users, and you can also choose where you want to apply those permissions. “权限项为...”对话框打开。在这里,您将看到有一个可用于您的用户的权限列表,您还可以选择要应用这些权限的位置
    Figure 6: Permissions entry folders 图6: 权限条目文件夹
  19. Use the drop-down menu in the “Apply to” field to assign selected permissions to desired folders.
  20. 使用“ Apply to”字段中的下拉菜单将选定的权限分配给所需的文件夹。
  21. Check the permissions as needed. These are self-explanatory.
  22. 根据需要检查权限。这些是不言自明的。
  23. Click “OK” to apply the permissions. It takes you back to “Advanced Security” window.
  24. 单击“确定”应用权限。它会将您带回到“高级安全”窗口。
  25. Now, move to the “Auditing” tab. Under this tab, you can do audit settings for the folder, so that any change done to this folder or its permission will be audited. Configure the auditing settings as per requirement.
  26. 现在,移动到“稽核”选项卡。在此选项卡下,您可以对该文件夹进行审计设置,以便对该文件夹或其权限所做的任何更改都会进行审计。根据需求配置审核设置。
  27. Similarly, you can do ownership settings for the folder under “Owner” tab.
  28. 类似地,您可以为“ Owner”选项卡下的文件夹进行所有权设置。
  29. Once you have done “Permission”, “Auditing” and “Ownership” settings, click “OK” to close “Advanced Security…” window.
  30. 完成“权限”、“审计”和“所有权”设置后,单击“确定”关闭“高级安全...”窗口。
  31. Click “OK” to close “Database Security…” window. Next, you will see “Add Object” window. 点击“确定”关闭“数据库安全...”窗口。下一步,您将看到“添加对象”窗口
    Figure 7: Add object window 图7: 添加对象窗口
  32. There are following options on the “Add Object” window: “添加对象”窗口有以下选项:
    1. Configure this file or folder then:配置该文件或文件夹,然后: Select this option to apply the settings. It contains the following two options. 选择此选项以应用设置。它包含以下两个选项
      1. Propagate inheritable permissions to all subfolders and files: Selecting this option means, all the subfolders and files will inherit permissions from the parent folder. In case of a mismatch or conflict, explicit permissions that were assigned to the subfolders or files will override the inherited permissions.
      2. 将可继承权限传播到所有子文件夹和文件: 选择此选项意味着,所有子文件夹和文件将继承来自父文件夹的权限。如果发生不匹配或冲突,分配给子文件夹或文件的显式权限将覆盖继承的权限。
      3. Replace existing permissions on all subfolders and files with inheritable permissions: This option will overwrite all the settings on all subfolders and files with the ones on the parent, so ultimately they will have identical permissions to the parent folder.
      4. 用可继承的权限替换所有子文件夹和文件上的现有权限: 这个选项将覆盖所有子文件夹和文件上的所有设置和父文件夹上的设置,因此最终它们对父文件夹拥有相同的权限。
    2. Do not allow permissions on this file or folder to be replaced: Use this setting for subfolders and files that you do not want to inherit permissions. For this, make an additional entry for those subfolders and files that will not inherit permissions e.g. let’s say you want the “A” folder to inherit permission but don’t want “B” folder to inherit permissions, in that case create an entry for the “B” folder.
    3. 不允许替换此文件或文件夹上的权限: 对不希望继承权限的子文件夹和文件使用此设置。为此,为那些不会继承权限的子文件夹和文件创建一个额外的条目,例如,假设你希望“ a”文件夹继承权限,但不希望“ b”文件夹继承权限,在这种情况下为“ b”文件夹创建一个条目。

    NOTE: In this case, option “a” has been selected. Click “OK” to close the “Add Object” window.

    注意: 在这种情况下,选项“ a”已经被选中。单击“确定”关闭“添加对象”窗口。

  33. Close “Group Policy Management Editor” window.
  34. 关闭“组策略管理编辑器”窗口。
  35. Right-click the domain you want to apply this GPO to, and then select “Link an Existing GPO…” option from the context menu. “Select GPO” window opens up. 右键单击要应用此 GPO 的域,然后从上下文菜单中选择“链接现有 GPO...”选项。“选择 GPO”窗口打开
    Figure 8: Select the new GPO
    图8: 选择新的 GPO
  36. Select the new “Assigning Folder Permissions” GPO, then click OK.
  37. 选择新的“分配文件夹权限”GPO,然后单击确定。
  38. In the right pane, stay on the “Linked Group Policy Objects” tab that appears by default.
  39. 在右窗格中,保持在默认出现的“链接组策略对象”选项卡上。
  40. Right-click on the “Assigning Folder Permissions”, and select “Enforced” from the context menu. A confirmation message appears on the screen.
  41. 右键单击“分配文件夹权限”,然后从上下文菜单中选择“强制”。屏幕上会出现一条确认消息。
  42. Click “OK” to close the dialog box.
  43. 单击“确定”关闭对话框。

Using Lepide File Server Auditor to audit files and folders changes

使用 Lepide File Server Auditor 审计文件和文件夹更改

To audit files and folders using Lepide File Server Auditor, at first add the file server to the application, and configure audit settings.

要使用 Lepide File Server Auditor 审计文件和文件夹,首先将文件服务器添加到应用程序中,并配置审计设置。

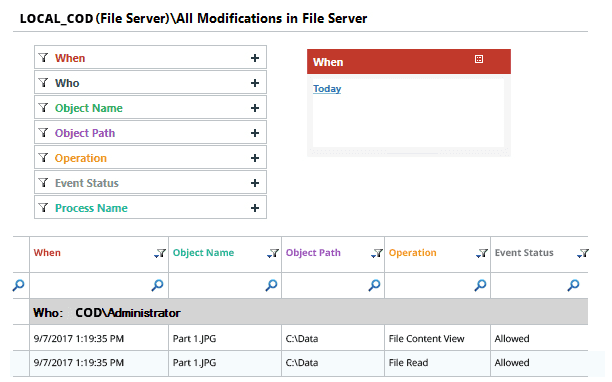
In the following screen, you can see the report on all modifications made in file server that shows all changes made to files and folders including their permissions. All the relevant information about auditing like who changed what, when and where is shown in a single record. Details pane gives further information about the record.

在下面的屏幕中,您可以看到关于在文件服务器中所做的所有修改的报告,其中显示了对文件和文件夹所做的所有修改,包括它们的权限。有关审计的所有相关信息,如谁更改了什么、何时、何地显示在单个记录中。“详细信息”窗格提供有关记录的进一步信息。

Figure 9: All modifications in a file server
图9: 文件服务器中的所有修改

Conclusion

总结

In this article, you have seen the way to assign files and folders permissions through GPO. You have also seen the auditing of changes made to files and folders using Lepide File Server Auditor. The solution has pre-defined file and folders modification and permission modification reports that make enterprises safe and compliance-ready.

在本文中,您已经看到了通过 GPO 分配文件和文件夹权限的方法。您还看到了使用 Lepide File Server Auditor 对文件和文件夹所做更改的审计。该解决方案具有预定义的文件和文件夹修改和权限修改报告,使企业能够安全和遵从。

如何只允许员工电脑上钉钉?同时屏蔽其他网络行为

钉钉的使用过程中必须连接外网,对于网络权限设置比较严格的局域网来说,如何开放钉钉一直是一个难题。由于钉钉官方已经不再公布服务器的段,所以不能基于IP范围来做管控。必须要有专业的上网行为管理产品,才可以准确识别出钉钉的流量并且加以管控。

本文,我就来介绍下在WSG上网行为管理网关中如何放行钉钉。钉钉的使用需要通过https访问钉钉相关的网站,另外还有自己的通讯协议(端口443)。所以要放行钉钉,我们需要放行DNS、钉钉这两个应用协议,并且允许钉钉的相关网站。具体的配置步骤如下:

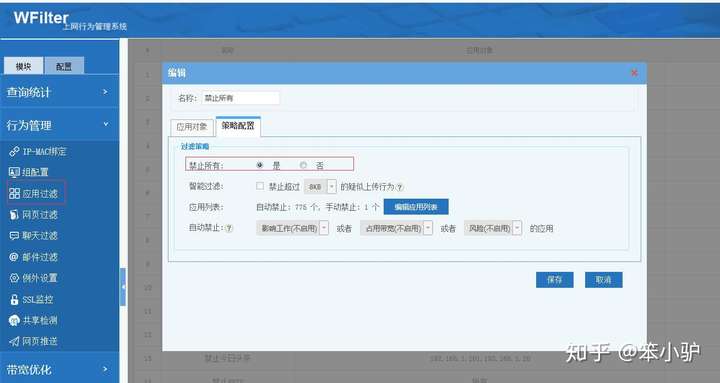
1. 屏蔽所有网络应用

首先在应用过滤中,屏蔽所有的网络应用。


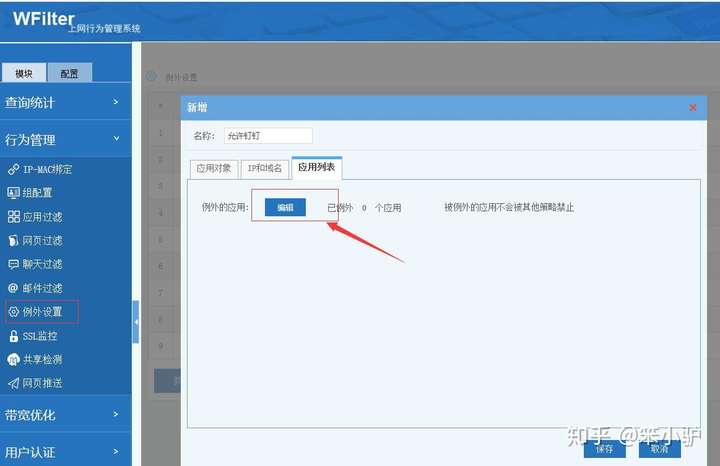
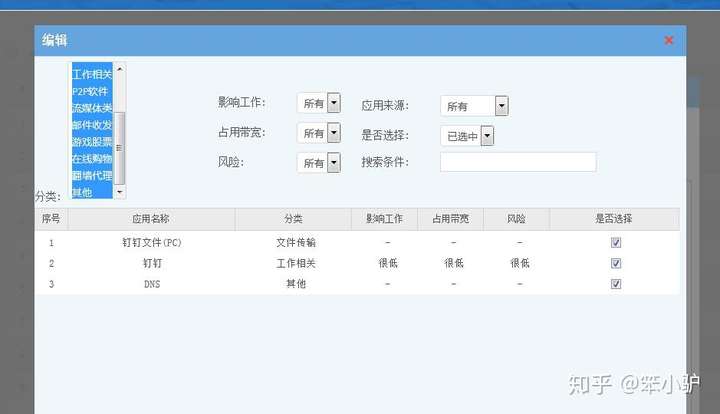
2. 允许钉钉、DNS、钉钉文件传输

在例外设置中,添加例外规则,把”钉钉、DNS、钉钉文件传输“加到“例外的应用”里面。


3. 允许钉钉的相关网站

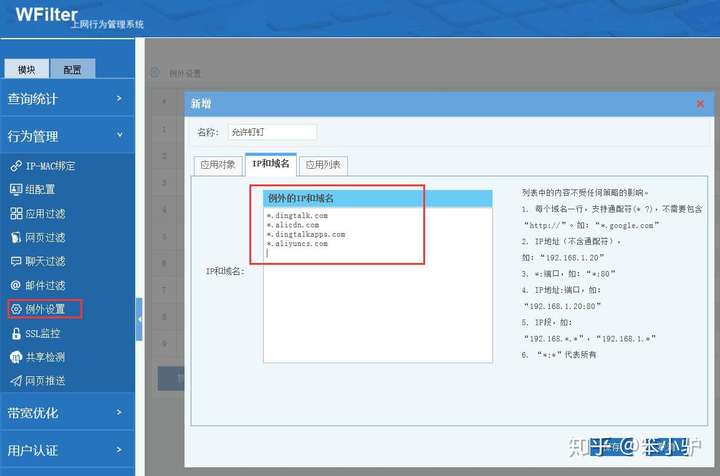
除了钉钉的应用协议外,还需要把钉钉的相关网站"*.dingtalk.com","*.alicdn.com","*.dingtalkapps.com", "*.aliyuncs.com"加入到例外。如下图:


“例外设置”的优先级是最高的。经过上述配置后,WFilter会首先放行钉钉的应用和钉钉的相关网站,其余的网络通讯会一律被“应用过滤”的策略屏蔽掉。从而达到了只允许使用钉钉的管控效果。

About Us

Since 1996, our company has been focusing on domain name registration, web hosting, server hosting, website construction, e-commerce and other Internet services, and constantly practicing the concept of "providing enterprise-level solutions and providing personalized service support". As a Dell Authorized Solution Provider, we also provide hardware product solutions associated with the company's services.
 

Contact Us

Address: No. 2, Jingwu Road, Zhengzhou City, Henan Province

Phone: 0086-371-63520088 

QQ:76257322

Website: 800188.com

E-mail: This email address is being protected from spambots. You need JavaScript enabled to view it.