以下是添加Xlight FTP Server注册码的详细步骤,结合官方激活流程及第三方破解方法(注意:破解版本存在法律风险,建议支持正版):
---
### **一、合法激活流程(推荐)**
1. **获取正版注册码**
- 从官方网站购买专业版或标准版授权后,会收到官方提供的注册码。个人用途可免费使用个人版,无需注册码。
2. **软件内输入注册码**
1. 打开Xlight FTP Server,点击右上角菜单栏的 **“服务” > “注册”** 。
2. 在弹出的窗口中粘贴注册码,点击 **“确定”**,提示激活成功后即可解锁专业版功能。
3. 激活后,专业版支持无限用户、ODBC数据库、活动目录集成等高级功能。
---
### **二、破解版激活方法(风险提示)**
**注意:破解行为违反软件许可协议,可能导致法律纠纷或安全风险。以下步骤仅供技术研究参考:**
1. **下载破解补丁与注册码**
- 从第三方网站获取含注册码的破解包(如网页8提供的破解补丁)。
2. **覆盖补丁文件**
1. 安装Xlight FTP Server后,**切勿启动软件**。
2. 将破解补丁文件(如`.dll`或`.exe`)复制到软件安装目录,替换原文件。
3. **输入注册码**
- 启动软件,进入注册页面,输入附带的注册码完成激活。
---
### **三、版本功能与限制**
| **版本类型** | **功能限制** | **是否需要注册码** |
|--------------|----------------------------------|--------------------|
| 个人版 | 仅限个人使用,无远程管理、ODBC、活动目录 | 免费,无需注册码 |
| 标准版 | 限制50用户,支持SSL、反盗链 | 需购买注册码 |
| 专业版 | 无限用户,完整功能 | 需购买注册码 |
---
### **四、常见问题与注意事项**
1. **注册失败的可能原因**
- 注册码与软件版本不匹配(如标准版注册码用于专业版)。
- 未关闭杀毒软件导致补丁文件被误删(仅限破解版)。
2. **试用期处理**
- 专业版提供30天试用期,到期后自动降级为个人版,需购买注册码恢复功能。
3. **安全建议**
- 避免使用破解版:可能携带恶意代码或导致数据泄露。
- 官方下载地址:优先通过Xlight官网或可信渠道获取软件。
---
如需进一步了解版本差异或购买正版授权,可参考[Xlight FTP Server官网](https://www.xlightftpd.com)或相关软件平台说明。
附:
Xlight FTP Server Pro激活教程
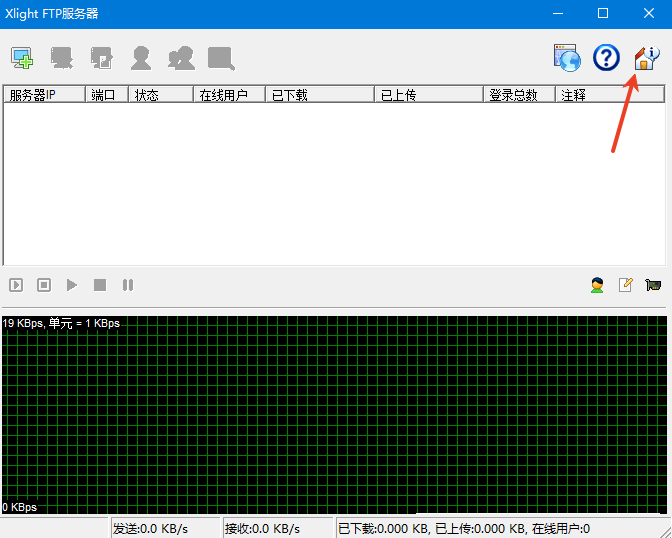
1、下载好之后解压,打开软件点击右上角服务。
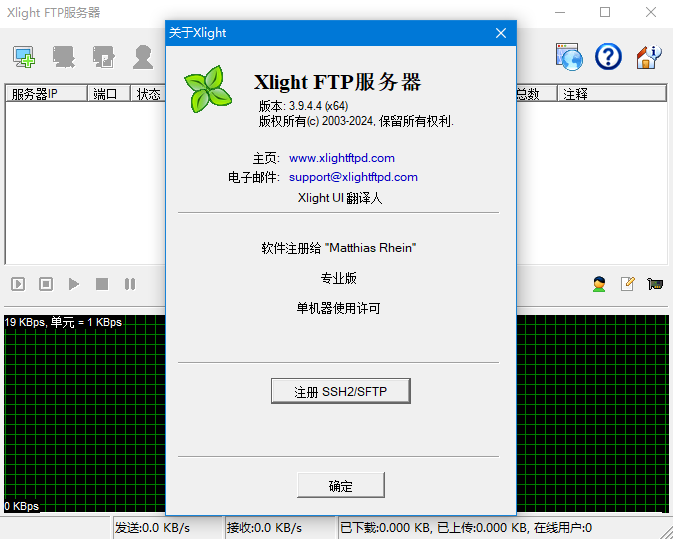
2、点击注册,将压缩包中的注册码复制到软件当中即可。
软件特征
一、FTP服务器与企业IT环境整合
1、支持活动目录(Active Directory)
用户认证可以使用活动目录(Active Directory). 可以将FTP服务器的用户设置保存在活动目录.
2、支持LDAP
用户认证可以使用LDAP目录服务器. 可以将FTP服务器的用户设置保存在LDAP目录服务器.
3、用户可以使用数据库
FTP服务器的用户账户,密码和设置可以存储在外部数据库,便於统一管理. 支持数据库存储过程便於和其他数据库应用整合.
4、128比特SSL加密
採用业界公认的安全标準保护FTP会话和数据传输, 支持SSL客户端证书认证.
5、支持 SFTP(SSH2) 协议
SFTP虚拟服务器现在能够象FTP虚拟服务器一样被创建和管理.
6、电子邮件事件通知
可以自动通过电子邮件通知FTP服务器的事件,如磁盘空间不足,用户上传,下载等.
7、UNC路径账号身份模拟
FTP服务器可以使用多个身份模拟账号访问受到密码保护的不同远端网络共享.
二、FTP服务器日誌和审计
1、FTP 会话和错误日誌
详细的FTP 会话和错误日誌.
2、Unix xferlog格式的支持
支持UNIX下FTP文件传输xferlog格式的日誌,能够直接被AWStats之类的流量统计工具使用.
3、保存文件传输日誌在数据库
文件传输日誌可以通过ODBC保存在数据库内.
4、发送日誌到Syslog服务器
所有服务器日誌可以同时发送到Syslog服务器.
三、FTP服务器管理
1、图型界面的远程管理
远程管理不需要专门的端口,可以通过FTP端口直接管理,在任何地方都可以轻鬆管理位於防火墙内的FTP服务器.
2、分级的虚拟目录系统
提供公共,以及组虚拟目录,便於管理和设置不同用户之间的文件共享。组虚拟目录能够被组中所有用户看到,公共虚拟目录能够被所有用户看到.
3、实时的配置管理
所有的FTP配置更改都立刻生效,无须重新啟动FTP服务器,不会因為更改配置造成用户服务中断.
4、细微的带宽管理
可以对服务器的总带宽,虚拟服务器,组的带宽以及单个用户的速度进行细调,也可以根据时间,动态设定FTP服务器的带宽.
四、其他FTP服务器的主要功能
1、反盗链保护功能
FTP服务器能够提供反盗链保护功能.
2、MODE Z 支持
支持数据传输的实时压缩.
3、访问控制列表
提供了很多方法,灵活方便的控制用户在FTP服务器的访问权限.
4、支持UPnP
当FTP服务器在宽带路由器后,可以方便通过UPnP配置宽带路由器让外部用户访问.
5、完整的IPv6支持
无缝的IPv6功能整合,所有FTP服务器功能都已经支持IPv6.
软件使用说明
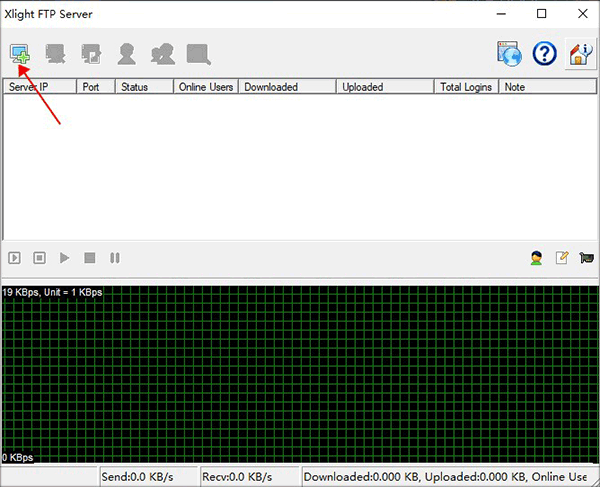
1、启动Xlight FTP Server Pro软件,点击"增加虚拟服务器"按钮;
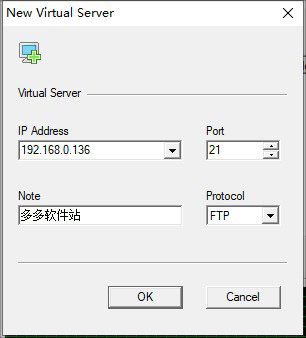
2、在弹出的窗口中选择本机IP地址,点击“确定”,并记录该IP地址作为服务器,IP地址可以在“网络”—"属性"中查找;
3、回到主界面,然后点击“更改虚拟服务器配置”按钮;
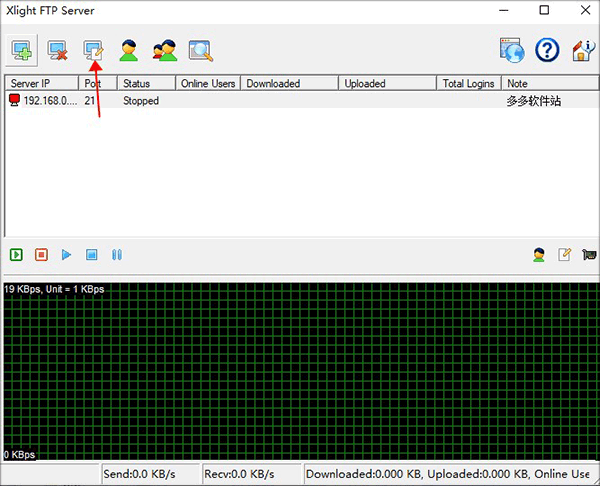
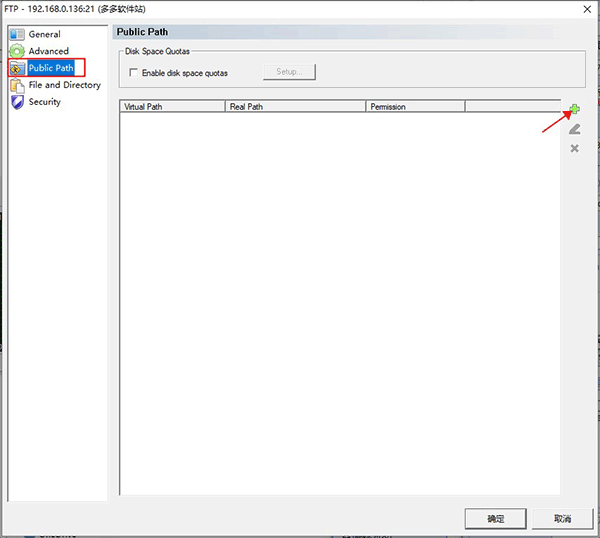
4、在弹出的窗口中,选择“公共目录”,点击右边的“增加”按钮;
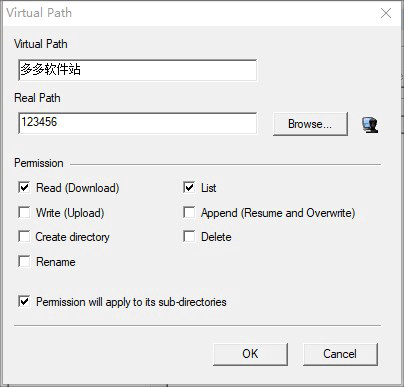
5、在弹出的窗口中设置虚拟/实际目录,配置用户权限,如下图所示:
6、配置完权限之后,增加用户,在软件这界面中点击“用户列表”,然后点击右边的“增加”按钮;
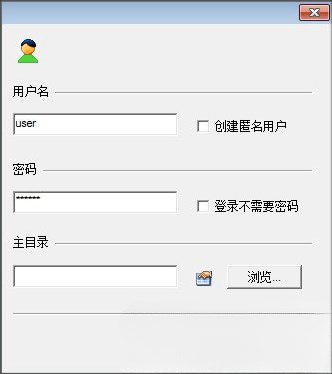
7、在弹出的窗口中,填写用户名,密码,点击“确定”;
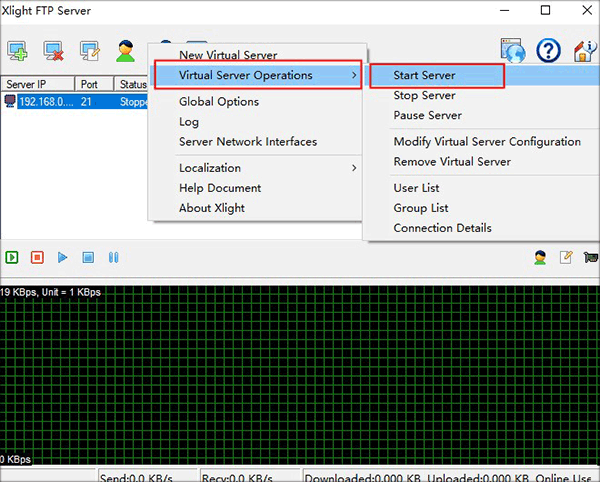
8、回到软件主界面,选择前面配置的服务器,点击右键,选择“启动服务器”,到这里,ftp服务器的配置工作完成,通过在本地机器地址栏输入IP地址,即可进行访问。

 English
 中文
中文 