Wishlist 0 ¥0.00

How to Install XP on an External Hard Drive

Windows XP was built to run on internal system hard drives. It has no simple setup or configuration option to run on an external hard drive. It is possible to \"make\" XP run on an external hard drive, but it involves a lot of tweaking, including making the external drive bootable and editing boot files.


Creating the Windows XP Boot Image

Set your BIOS so that USB booting is enabled. (Your BIOS must support boot from USB.) Connect the USB external hard drive directly to your computer.

Make an ISO image (an .iso file is an archive disk image of an optical disk) from the Windows XP CD-ROM using your preferred software. Save to your hard drive.


Open the ISO file you just created. Navigate to the I386 folder, and select the following files: TXTSETUP.SIF, DOSNET.INF, USB.IN_, USBPORT.IN_, and USBSTOR.IN_. Extract the files and put them into a folder to work with.

Open a command prompt and use Cab SDK to extract the contents of the .IN_ files; Cab SDK is a Microsoft compression and decompression program available as an .exe file in your Windows directory. Each of the .IN_ files contains exactly one .inf file. An example command line would be: \"cabarc x USBSTOR.IN_\" . You should end up with three new files in the folder, called USB.inf, usbport.inf and usbstor.inf. Delete the .IN_ files.

Open the files using a simple text editor such as Notepad. Edit them according to the section below titled \"Editing Files.\"

Open the previously created ISO file and delete the files you extracted earlier. Replace them with the newly modified files.

Save the ISO files and burn them to a CD using the burning software of your choice.

Insert the CD you created and restart the computer. Make sure it is set to boot from CD. Most computers will do this automatically, but if not, hit F8 on startup to choose boot options. When asked, choose the external USB hard drive to install WIndows XP.

Editing Files

Open TXTSETUP.SIF and move the following entries from [InputDevicesSupport.Load] to the [BootBusExtenders.Load]: usbehci = usbehci.sys usbohci = usbohci.sys usbuhci = usbuhci.sys usbhub = usbhub.sys usbstor = usbstor.sys

Move the following entries from [InputDevicesSupport] to [BootBusExtenders]: usbehci = \"Erweiterter Hostcontroller\",files.usbehci,usbehci usbohci = \"Open Hostcontroller\",files.usbohci,usbohci usbuhci = \"Universeller Hostcontroller\",files.usbuhci,usbuhci usbhub = \"Standard-USB-Hubtreiber\",files.usbhub,usbhub usbstor = \"USB-Speicherklassentreiber\",files.usbstor,usbstor


Insert the following in the [HiveInfs.Fresh] section: AddReg = hivedef.inf,AddReg AddReg = hivesys.inf,AddReg AddReg = hivesft.inf,AddReg AddReg = hivecls.inf,AddReg AddReg = hiveusd.inf,AddReg AddReg = dmreg.inf,DM.AddReg AddReg = usbboot.inf,usbservices

Insert the following commands into the [SourceDisksFiles] section:

Open DOSNET.INF and change the second [Files] section to look like this: [Files] d1,usbboot.inf d1,_default.pif d1,12520437.cpx d1,12520850.cpx

Open USB.INF and change lines in the [StandardHub.AddService] and [CommonClassParent.AddService] sections to look like this:

Open usbport.inf and change lines in the [EHCI.AddService], [OHCI.AddService] , [UHCI.AddService] and [ROOTHUB.AddService] sections to look like this:

Open usbstore.inf and change lines in the [USBSTOR.AddService] section to look like this:

Create a new file called USBBOOT.INF in the same directory as the other modified files, and paste the following content into it: [usbservices]

Delete your original extracted .IN_ files. Open the command prompt and navigate to the folder with your changed files. Execute these commands to repack the files: cabarc n USB.IN_ USB.inf cabarc n USBPORT.IN_ usbport.inf cabarc n USBSTOR.IN_ usbstor.inf

Items you will need

  • Windows XP CD

  • USB external hard disk drive

  • ISO creation software (WinISO)

  • CD-burning software that can handle ISO files

virtualbox虚拟机和主机不在同一网段,虚拟机访问互联网网络配置

用virtual box在win10里搭建了一个虚拟机,虚拟机安装的是linux,部署了nginx、mysql、redis、MongoDB等开发服务器,刚开始的时候,我的win10主机和虚拟机都在同一个网段,比如 主机是192.168.1.100,虚拟机是192.168.1.101,这样,我只要设置virtual box主机的网络为“桥接网络”方式,并且在Linux主机里配置网卡的网关为无线路由器的IP地址,比如:192.168.1.1,这样win10主机和linux虚拟主机就可以通讯,并且linux虚拟机也可以访问互联网,配置很简单,使用也没有问题。

可是我的电脑是笔记本,经常会在公司、家里、获取其他办公环境使用。

这时笔记本电脑主机连接的网络环境会发生变化,比如公司的IP段是:192.168.2.*,这样,如果每次切换网络环境就要将虚拟机切换到对应的网段,设置起来比较麻烦。

刚开始,我尝试了一种方式,就是将win10主机的网卡设置为手动设置IP,并且在网卡的高级设置里增加多一个和虚拟主机同一网段的IP,将虚拟机的网关设置为网卡新增的IP,这样改动后,win10主机和linux虚拟机是可以通讯的,但是,linux虚拟机却不能访问互联网,这样在开发微信相关的程序时就会有问题,因为,虚拟主机和微信服务器必须要通讯才可以进行开发调试。

最后,只能更改为下面的方案,亲测可用,使用也方便,操作步骤如下:

1 给win10主机增加一个虚拟网卡:

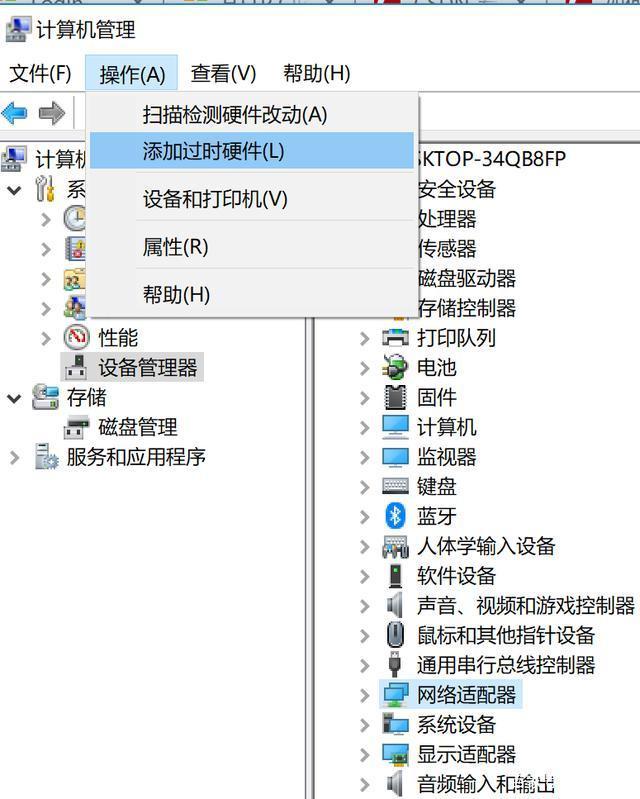
1)打开win10的设备管理器,定位到网络适配器,然后从操作菜单里点击“添加过时硬件”

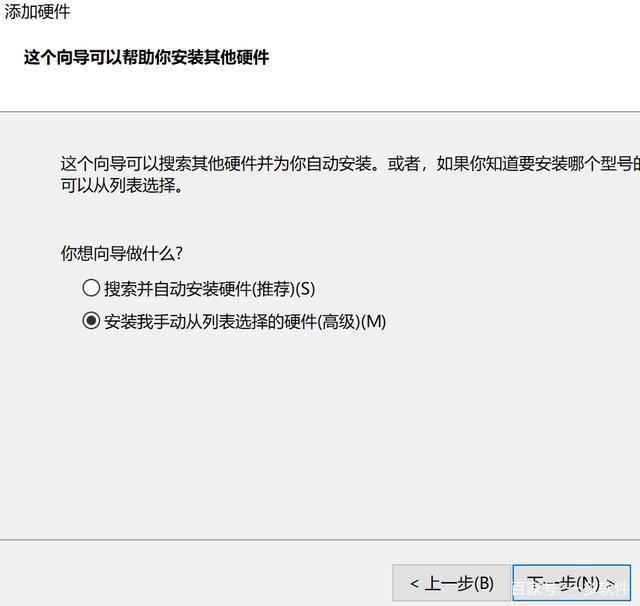
2)选择“安装我手动从列表选择的硬件”

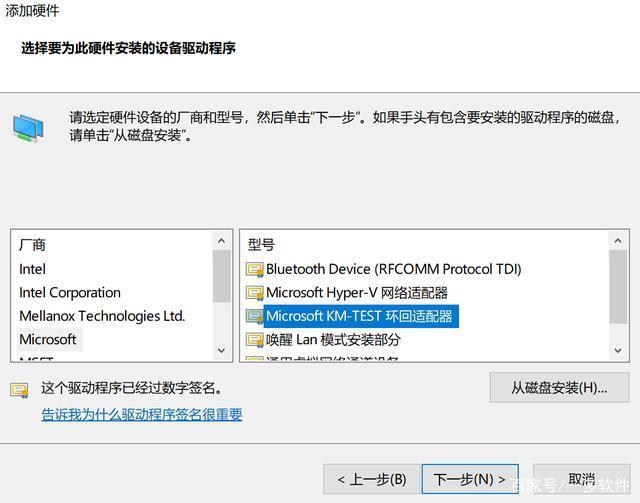
3)选择安装的硬件是“网络适配器”,并且在下一步里,选择安装的是Microsoft公司的“Microsoft KM-TEST环回适配器”

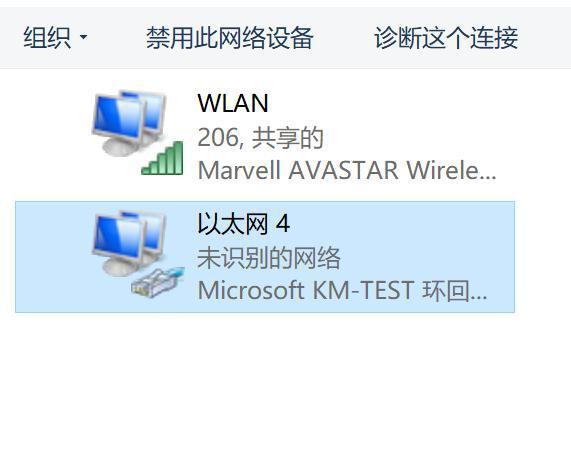
4)继续下一步完成安装后,进入网络连接配置功能里,就会多了一个虚拟网卡了

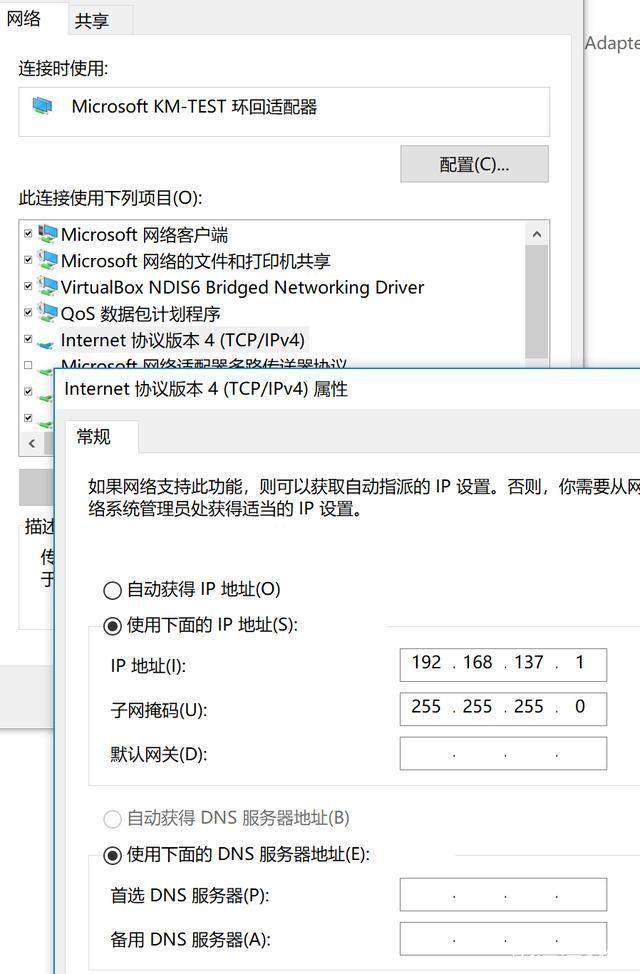
5)对该虚拟网卡的属性进行设置,记得不用设置网关,也不用设置DNS,如下图:

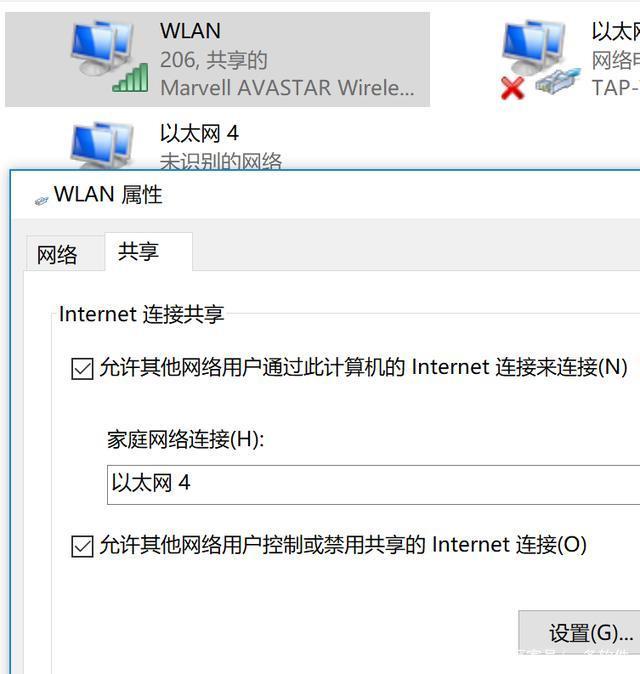
6)在真正的网卡上设置网络共享,记得共享上网的网卡需要选择刚刚新增的虚拟网卡,如下图:

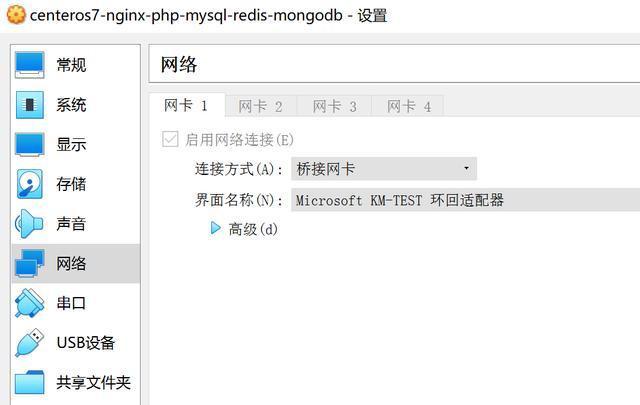
7)进入virtual box主机里设置虚拟主机的网络为“桥接网络”,并且指定的网卡是刚刚新增的虚拟网卡,如下图:

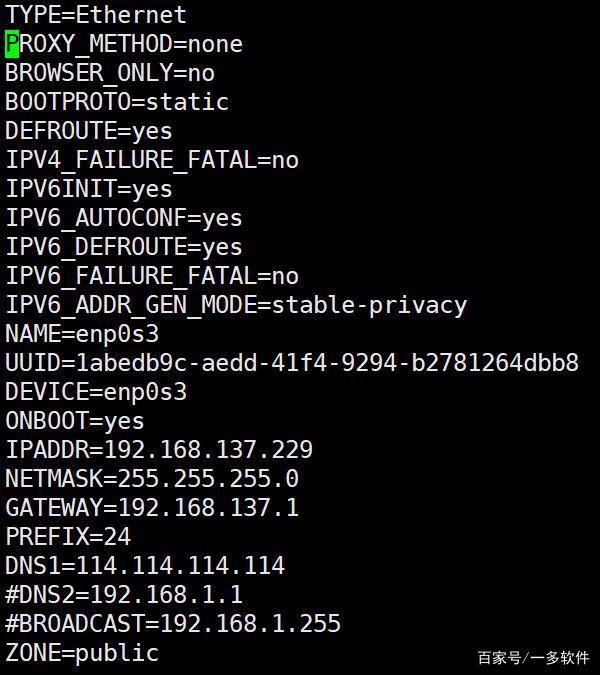
8)启动虚拟主机,给虚拟主机的网卡配置一个跟虚拟网卡处于同一网段的IP,并且将网关指定为虚拟网卡设置的IP地址:

9)systemctl restart netwrok 重启网络,然后win10主机和linux虚拟主机就可以通讯了,同时linux虚拟主机也可以访问互联网了

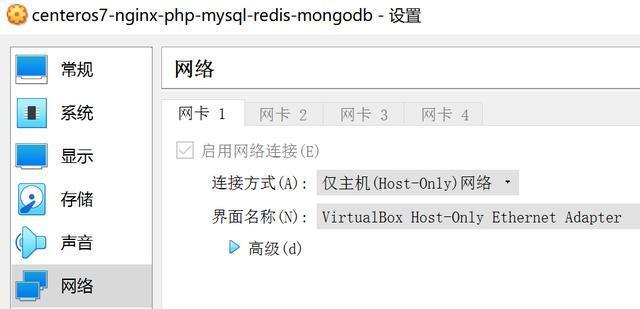
我还尝试过用virtual box自带的VirtualBox Host-Only Ethernet Adapter进行连接,如果通过VirtualBox Host-Only Ethernet Adapter我测试过时不能桥接的,只能在virtual box主机网络配置中选择为“host-only”方式,其他的配置方式基本相同,不过个人觉得用上面的方式更简单直接一点。


USB basics and troubleshooting

USB basics and troubleshooting

Postby socratis » 11. Apr 2017, 16:13

Despite its reputation, USB is not always plug and play, even more so in a virtual environment. You have to talk almost directly to the hardware via a series of software layers. The more layers, the more complicated things become. That explains the length of this article. If things were so easy, this FAQ would be very small and it wouldn't require a Table Of Contents:
  1. Sharing USB devices
  2. Capturing a USB device in VirtualBox
  3. Device categories
  4. USB Filters
  5. Common problems
  6. Guest support
  7. Troubleshooting
  8. Asking for help
#1: Sharing USB devices
USB devices cannot be shared at the bus level. That means that two computers (a host and a guest) cannot share the same device. Think of it as having a USB stick, a printer, a webcam or a WiFi adapter hooked into two computers at the same time. You simply can't.

There are other means of sharing for some device categories. Such as: shared or network folders for mass storage devices, printer sharing for printer/scanners/fax devices. You simply cannot have direct resource sharing.

IMPORTANT
      If you can share the device from the host (be it Shared/Network Folders, or Printer sharing), go for that option! It's much easier, and
both
    the host and the guest can access the shared USB resources.
Do NOT send me Personal Messages (PMs) for troubleshooting, they are simply deleted.
Do NOT reply with the "QUOTE" button, please use the "POST REPLY", at the bottom of the form.
If you obfuscate any information requested, I will obfuscate my response. These are virtual UUIDs, not real ones.
socratis
Site Moderator
 
Posts: 27693
Joined: 22. Oct 2010, 11:03
Location: Greece
Primary OS: Mac OS X other
VBox Version: PUEL
Guest OSses: Win(*>98), Linux*, OSX>10.5
Top

Re: USB basics and troubleshooting

Postby socratis » 11. Apr 2017, 16:13

#2: Capturing a USB device in VirtualBox
There are two ways to capture a USB device in a guest in VirtualBox:
  • On-the-fly
        A "transient" solution, either by using the icon on the bottom of the window, or the menu "Devices » USB » ...". The captured devices are indicated by the check next to them. The rest of the devices in the list, simply show you the devices currently present in the host. That does NOT mean you can capture them at will. See "
    Device categories
      " below.
  • USB filter
        A more "permanent" solution and one that captures the device as soon as it is inserted into the host, but
    only after the VM is already up and running
        . A filter should be ideally created specifically for each device. See "
    USB Filters
        " below.


      NB: You can have both a filter, and use the transient nature of the list. So, for example, you have setup a filter for a USB stick. As soon as you insert the stick, the filter captures it, and it shows in the list as "checked" (captured). You can then check/uncheck the device in the list at will to make it available in your host. But since you used a filter, the guest has the first saying.
    The "USB filter" option is strongly suggested, compared to the "On-the-fly" option (Devices » USB » ...), because it's more robust and it works in the majority of cases.


    NOTE for Linux hosts
    For Linux hosts, please make sure that you are a part of the "vboxusers" group and verify your membership with the "id" command, after a logout or a reboot. Otherwise you will not see any USB devices. Also remember that only the official download from VirtualBox is supported, not your distro's.
Do NOT send me Personal Messages (PMs) for troubleshooting, they are simply deleted.
Do NOT reply with the "QUOTE" button, please use the "POST REPLY", at the bottom of the form.
If you obfuscate any information requested, I will obfuscate my response. These are virtual UUIDs, not real ones.
socratis
Site Moderator
 
Posts: 27693
Joined: 22. Oct 2010, 11:03
Location: Greece
Primary OS: Mac OS X other
VBox Version: PUEL
Guest OSses: Win(*>98), Linux*, OSX>10.5
Top

Re: USB basics and troubleshooting

Postby socratis » 11. Apr 2017, 16:14

#3: Device categories
There are several categories of USB devices:
  • Uncapturable
      These are USB devices that are captured by the host with a daemon or service (e.g. Bluetooth controller). Not only you can't make the on-the-fly option work, but you can't even get it to work with a filter, unless you disable the host service/daemon. The device then becomes "Idling", see below.
  • Ejectable
        These are USB devices that are captured by the host and are actively used (e.g. USB sticks, external HDs). You have to eject them first to be able to use them with the on-the-fly option. If you have a filter and you plug the device after the VM has started, it gets captured by the filter.


        NB 1: In some OSes (Linux, Windows) you don't have to eject such a device specifically from the host in order to capture it with the on-the-fly option. That would place them in the "
    Idling
        " category, see below.


      NB 2: I haven't tried what happens if you have multiple VMs with the same filter active.
  • Un-ejectable
        These are USB devices that are captured by the host, but cannot be ejected (e.g. gamepads, joysticks, mice, keyboards). You have to unplug them
    and
      use a USB filter. The on-the-fly option doesn't work, simply because you cannot release them from your host.
  • Idling
      These are USB devices that are sitting, waiting to be used (e.g. gamepads, joysticks, IR receivers, ejected devices). You can capture them with either the on-the-fly or the filter option.
NB: You may have noticed that some devices are listed both in the "Un-ejectable" and in the "Idling" categories (e.g. gamepads, joysticks). The answer to that is that it depends both on the device and the host. You cannot know a priori.
Do NOT send me Personal Messages (PMs) for troubleshooting, they are simply deleted.
Do NOT reply with the "QUOTE" button, please use the "POST REPLY", at the bottom of the form.
If you obfuscate any information requested, I will obfuscate my response. These are virtual UUIDs, not real ones.
socratis
Site Moderator
 
Posts: 27693
Joined: 22. Oct 2010, 11:03
Location: Greece
Primary OS: Mac OS X other
VBox Version: PUEL
Guest OSses: Win(*>98), Linux*, OSX>10.5
Top

Re: USB basics and troubleshooting

Postby socratis » 11. Apr 2017, 16:14

#4: USB Filters
A USB filter is a series of "AND" conditional statements. So when you're filling in the filter values, you're telling the filter:
Capture a device with this VendorID, AND that ProductID, AND ...
A blank filter (not recommended!) will match anything, which is good if the device appears as a composite, i.e. presents as a number of different devices all connected at once. However the danger of a blank filter is the potential to grab the wrong device, e.g. you do not want to grab the host's USB keyboard and assign it to the guest! If you have a problem with the wrong device being grabbed then you'll need to add just enough information to the filter so that it matches your device only. But don't define the filter too narrowly, as that can lead to problems too. That's why your safest bet for a basic filter is to fill in the VendorID and ProductID only. The proper checklist for capturing a USB device with a filter is:

  1. Make sure that the Extension Pack (ExtPack) is installed on the host. The ExtPack must be the same version as the main VirtualBox program. The ExtPack is not the same as the Guest Additions! The ExtPack is installed on the host and adds support for a virtual USB2 host controller. VirtualBox 5.x.x added USB3 (xHCI) support as well.

  2. Make sure that at least USB2 (EHCI) is enabled in your VM settings. If your guest supports USB3 (xHCI), use that. See "Guest support" below. It is important to note that if your guest supports USB3, you should definitely enable that, even if your host does NOT support USB3 at the hardware or software level, mainly because the USB3 stack is much better designed compared to USB1 and USB2.

  3. Under VM Settings » Port » USB, create a USB filter in your guest settings while the device is plugged in the host. Delete all values except Name, VendorID and ProductID. The Name is nothing more than a label and is not actively participating in the filtering process. You can change it at will. I usually use "Stick: XYZ" or "Joystick: ABC" or "Other: IJK".
    Image


  4. Unplug the device.

  5. Start your guest (the one that you applied the filter to). Let it start completely. Log in if you have to, reach the desktop, and wait until any disk activity has stopped.

  6. Plug your device. The filter should capture it and pass control to your guest.
Do NOT send me Personal Messages (PMs) for troubleshooting, they are simply deleted.
Do NOT reply with the "QUOTE" button, please use the "POST REPLY", at the bottom of the form.
If you obfuscate any information requested, I will obfuscate my response. These are virtual UUIDs, not real ones.
socratis
Site Moderator
 
Posts: 27693
Joined: 22. Oct 2010, 11:03
Location: Greece
Primary OS: Mac OS X other
VBox Version: PUEL
Guest OSses: Win(*>98), Linux*, OSX>10.5
Top

Re: USB basics and troubleshooting

Postby socratis » 11. Apr 2017, 16:14

#5: Common problems
  • Error: Busy with a previous request (VERR_RESOURCE_BUSY)
    • The error means that something else (most probably the host) is using the device. Take a look at the "Basics - Device categories" and see which category your device falls under and take appropriate action: eject it, uncapture it, stop the service/daemon that uses it, unplug it and create a filter.

    • This error can also mean that another filter is installed on your host and is actively monitoring/filtering your USB connections. Such filters can be installed with antivirus programs, AMD USB Filter, Microsoft's RemoteFX USB Redirection, NoMachine, Dell DPE, or Wireshark and its USBPcap component. Or any other application with a USB filtering mechanism. Or custom USB drivers for your host.

    • This error can mean a lot of other not so common things. Take a look at the "Troubleshooting" section.
  • VERR_PDM_NO_USB_PORTS
        You are trying to use a USB3 device with a guest that does not support USB3 (see the "
    Guest support
      " section), or you haven't enabled the USB3 option in the VM settings.
  • No USB devices are listed
      Something is not right with the installation of the VirtualBox USB filter. If you are on Linux, are you a member of the "vboxusers" group? Did you verify it? Did you logout/login or reboot? If you're on Windows did you try reinstalling VirtualBox with the Run-As-Administrator option?
  • Device gets randomly disconnected
      Check the power options for that device. Make sure that the guest OS does not shut down the device in order to save power.
  • Unknown USB device detected
        Actually, this message has been removed from the latest VirtualBox versions, because there was actually nothing that VirtualBox could do about it. VirtualBox gets the USB VendorID/ProductID information from "
    The USB ID Repository
      ", so it's actually them that you have to notify. See the "Submit new data" section for more information.
  • Distinguish identical devices
        Sometimes you have to plug two identical devices and you cannot distinguish them. Either you have to activate more criteria in the filter, like the "Serial No." or the "Port" that they're connected to. If they're
    really
        identical (even the serial number), there's not that much you can do.


        There is a technique that
    might
      work, but it's so rare and convoluted that it's not part of the FAQ. Start a new topic describing your problem.
Do NOT send me Personal Messages (PMs) for troubleshooting, they are simply deleted.
Do NOT reply with the "QUOTE" button, please use the "POST REPLY", at the bottom of the form.
If you obfuscate any information requested, I will obfuscate my response. These are virtual UUIDs, not real ones.
socratis
Site Moderator
 
Posts: 27693
Joined: 22. Oct 2010, 11:03
Location: Greece
Primary OS: Mac OS X other
VBox Version: PUEL
Guest OSses: Win(*>98), Linux*, OSX>10.5
Top

Re: USB basics and troubleshooting

Postby socratis » 11. Apr 2017, 16:15

#6: Guest support
Not all guest systems support all levels of USB. This is a general guideline, but for more specifics you've got to check with your guest OS's documentation:
  • No USB
    • DOS, Minix, Win 3.11, Win NT*, do not support USB at all. There are some "hacks" around but nothing tested certain.
  • USB1 only
    • Win9* and early Linux kernels. Almost all of the other OSes, if they support USB at all, support at least USB2.
  • USB2 only
    • OSX up to 10.6, Linux up to around 2010, Win9* , XP, Windows 7.
    • Especially for Win9*, and other old guests, the real problem usually isn't the host controller drivers but rather drivers for specific devices. Something like a USB mouse or keyboard or joystick typically works. See Tutorial: Windows 95/98 guest OSes.
  • USB3 with external drivers
    • WinXP: you need to install the Renesas drivers in your Windows XP guest. The instructions are in the article "USB 3.0 support in XP guests".
    • Win7: you need to install the "Intel USB 3.0 eXtensible Host Controller Driver" in your Windows 7 guest.

      Update 2019-11-20: Intel seems to have removed the driver from its official site, you can get it from the Archive.org site: http://web.archive.org/web/20190109223550/https://downloadmirror.intel.com/21129/eng/Intel(R)_USB_3.0_eXtensible_Host_Controller_Driver.zip
  • USB3
    • Most modern OSes support USB3.
Do NOT send me Personal Messages (PMs) for troubleshooting, they are simply deleted.
Do NOT reply with the "QUOTE" button, please use the "POST REPLY", at the bottom of the form.
If you obfuscate any information requested, I will obfuscate my response. These are virtual UUIDs, not real ones.
socratis
Site Moderator
 
Posts: 27693
Joined: 22. Oct 2010, 11:03
Location: Greece
Primary OS: Mac OS X other
VBox Version: PUEL
Guest OSses: Win(*>98), Linux*, OSX>10.5
Top

Re: USB basics and troubleshooting

Postby socratis » 11. Apr 2017, 16:15

#7: Troubleshooting

  1. Connect your device directly to the computer and not through a hub.

  2. Shutdown your guest from within your guest, normal shutdown. Shutdown your host. Reboot your host. Relaunch your guest. This has helped at times, to have a clean start of both host and guest.

  3. If the device shows up in your host and is not captured by the filter, either the filter is incorrect, or there might be a problem with your filter installation. For example you may have a blank filter, or a narrowly defined filter (too many conditionals).

  4. If the device shows up, but as "Unavailable", eject it from your host (if you can), but leave it plugged in. It should show up as available.

  5. Do you have the VendorID and DeviceID correct? On Linux hosts, check the output of "lsusb". On Mac hosts, check the "System Information". On Windows hosts, check the device manager, or get USBDeview, or USBView, or UsbTreeView.

  6. If you're using a USB3 device, make sure that both your host and your guest support USB3. And of course you have to be using the 5.x.x series of VirtualBox. If you plug a USB3 device into a USB3 port then it will only work with VirtualBox > 5, as that's when VirtualBox introduced a virtual xHCI controller.

  7. If on a Linux host, are you a member of the 'vboxusers' group? If not, add yourself with the following command and then reboot your host, or logout and login to activate the change in group membership:
    sudo usermod -a -G vboxusers <your_username>
  8. If on Windows host, check that the VirtualBox USB Driver is installed in your host. Make sure your host didn't silently reject non-MS drivers (Google for Driver Signature Enforcement). Usually a re-installation of VirtualBox with the "right-click on the installer & Run-as-Administrator" trick, fixes this.

  9. If on a Windows host, check out these Windows-specific ways to troubleshoot potential driver installation issues:
    1. USB not working
    2. SOLVED: Failed to access the USB subsystem on Windows 7 host
    3. Remove Driver Filters to Resolve Device Manager Errors on Windows 7
Do NOT send me Personal Messages (PMs) for troubleshooting, they are simply deleted.
Do NOT reply with the "QUOTE" button, please use the "POST REPLY", at the bottom of the form.
If you obfuscate any information requested, I will obfuscate my response. These are virtual UUIDs, not real ones.
socratis
Site Moderator
 
Posts: 27693
Joined: 22. Oct 2010, 11:03
Location: Greece
Primary OS: Mac OS X other
VBox Version: PUEL
Guest OSses: Win(*>98), Linux*, OSX>10.5
Top

Re: USB basics and troubleshooting

Postby socratis » 1. Jun 2017, 18:33

#8: Asking for help

If you've tried everything so far, and you had no luck, maybe it's time to open a new thread. Please read the Minimum information needed for assistance. Use the complete version numbers (including the build numbers) to identify software.

Once again, the "USB filter" option is strongly suggested, compared to the "On-the-fly" option (Devices » USB » ...), because it's more robust and it works in the majority of cases.

Connect your device directly to the computer, not through a hub.


Now, with the USB device plugged in and the VM not running, post the output of the following commands. Note that the 1st command applies to Windows hosts only, and the 2nd to Linux hosts only. It would be best if you unplugged any other unnecessary USB devices, for simplicity:

cd "C:\Program Files\Oracle\VirtualBox"      <-- change it if not the default installation
id <-- For Linux hosts only
VBoxManage -version
VBoxManage list extpacks
VBoxManage list usbhost
VBoxManage list usbfilters
VBoxManage showvminfo "<Your_Virtual_Machine_Name>"
Finally, a log from a cold_start / login / plug_USB / unplug_USB / complete_shutdown cycle:
  1. Start the VM from cold-boot (not from a paused or saved state).
  2. After you've logged in, plug the USB device. Wait (idling) for a minute or two. Unplug the USB device.
  3. Shutdown the VM (not paused or saved).
  4. Right-click on the VM in the VirtualBox Manager and select "Show Log".
  5. Save only the first "VBox.log", ZIP it and attach it to your response (see the "Upload attachment" tab below the reply form).
  6. You need to also find, ZIP and attach the "VBoxSVC.log", because the USB device enumeration and capturing is all done from VBoxSVC[1]:
    • Linux: "/home/.config/VirtualBox/VBoxSVC.log"
    • OSX: "/Users/<you>/VirtualBox/VBoxSVC.log"
    • Windows: "C:\Users\<you>\.VirtualBox\VBoxSVC.log" (note the period, ".")

USB dongle in virtual machine – VirtualBox

How to access a local USB dongle in VirtualBox


You may be aware that VirtualBox 5.0 includes USB dongle passthrough support. Here are simple instruction to assist you in using a USB dongle in VirtualBox.

  1. The free VirtualBox Extension Pack can be installed as an option to take advantage of USB 3.0 speeds.
  2. After installation on Windows, Linux, or other supported platforms, start your virtual machine.
  3. Connect the USB dongle to your host computer’s USB port.
  4. Navigate to Devices -> USB, and click on ‘USB device to share’.
USB dongle in VirtualBox

After you connect the USB dongle to VirtualBox, the shared USB device will become available in your host OS. The USB dongle will be recognized by your virtual machine providing complete access to your device. In this manner, VirtualBox allows you to connect to a USB dongle remotely.

Keep in mind that USB devices can only be accessed by one machine at a time.

2. Software solution to forward a USB dongle to virtual machine


Many users run into the issue of virtualization apps that do not offer full support for local USB devices. USB Network Gate is a software solution that can solve their problems.
 
 
USB Network Gate logo

USB Network Gate

Share USB over Ethernet on Windows
4.9 Rank based on 179+ users, Reviews(72)
 
14-day trial, You can share only 1 local USB-device


USB Network Gate


This dedicated tool’s USB redirection technology allows you to forward USB dongle over the Internet or LAN. USB Network Gate allows you to connect to USB dongle from your host machine even if the device is connected to another remote computer.

USB Network Gate

Three simple steps allow this remote connectivity:

  1. Download and install the USB Network Gate application on the machine with the attached USB dongle.
  2. Use the software interface and enable shrug of the device.
  3. On your virtual machine, install USB Network Gate. Start the application and connect it to the shared USB dongle.

USB Network Gate also offers cross-platform compatibility supporting Windows, Linux, and Mac OS.

3. Access USB dongle in VirtualBox via VRDP


Remote display of virtual machines is possible with VirtualBox. A guest OS started on one computer can be displayed and controlled from an alternate PC. VirtualBox accomplishes this through the use of VirtualBox Remote Display Protocol (VRDP). This protocol is backwards compatible with the Microsoft RDP protocol making VRDP an excellent solution when you need to access a virtual machine over an RDP connection.

VDRP also allows easy access to remote USB devices in VirtualBox. When displayed on a remote machines as VDRP data, the guest OS in VirtualBox can access all USB devices on the remote machine as if they were locally attached to the VM’s real host.

About Us

Since 1996, our company has been focusing on domain name registration, web hosting, server hosting, website construction, e-commerce and other Internet services, and constantly practicing the concept of "providing enterprise-level solutions and providing personalized service support". As a Dell Authorized Solution Provider, we also provide hardware product solutions associated with the company's services.
 

Contact Us

Address: No. 2, Jingwu Road, Zhengzhou City, Henan Province

Phone: 0086-371-63520088 

QQ:76257322

Website: 800188.com

E-mail: This email address is being protected from spambots. You need JavaScript enabled to view it.